Before we begin, let's make it clear that the webcam will be viewable in Live Cams but there will not be any audio and it is not a two-way video chat of any sort. The app is designed to be a viewer only and is supposed to provide home-security on your iPhone.
Let's begin!
Step 1 - Download and install EvoCam
Go to http://www.evological.com and download the trial version of EvoCam. Run the installer and diagnose any problems by checking the Evological website for details. Launch EvoCam. Unfortunately this software costs $30 and comes with a 30 day trial.

Step 2 - Configure your video sources in EvoCam
Choose File, New Window from the EvoCam application menus. If the video window does not automatically connect your camera (iSight or otherwise) then you will need to use the Video Settings button to configure your device.
Step 3 - Enable the built-in webserver
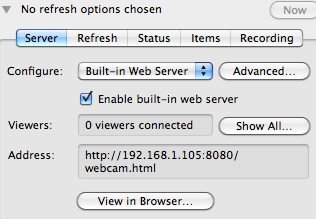
EvoCam does not automatically broadcast the video that it captures. To enable this feature you will need to go to the "Server" tab in the video window and then enable the built-in webserver. You may assign a username and password to the server if you press the "Advanced" button.

Step 4 - Find out the host and port that is being used by EvoCam
When you enable the built-in webserver the application will show a URL that contains your host and port. The host is the set of numbers after the http:// and before the colon. The port is the number after the colon.
Step 5 - Test the URL in Safari on your iPhone/iPod Touch
Launch Safari on your mobile device and enter the full URL that you see in the step above. If there aren't any firewalls active and the port is opened on your router you should see the EvoCam html page load. If the connection fails then you will need to open your firewall or turn it off so that traffic can go from the internet to your PC. Repeat this process until you can get Safari to connect to EvoCam. If Safari can't connect then Live Cams will also fail. This is by far the most common area for people to struggle with because of various software and hardware firewalls and router issues.
Step 6 - Launch Live Cams and add your camera
After Live Cams launches, click "Add Camera" and scroll down until you find the EvoCam option. Select it by touching the word EvoCam. On the next screen that loads you will enter:
1. The name that you want to assign to the camera.
2. The host (your router IP or DNS name). This is the number shown in EvoCam which is in the form xxx.xxx.xxx.xxx and does NOT include the http:// or the ":"
3. The port shown in EvoCam. This is the number after the colon (8080 in my example screenshots)
4. Leave the username and password blank unless you assigned a password in EvoCam.
5. If you have multiple cameras configured you will need to adjust the camera number accordingly, otherwise leave it to the default value of 1.
Save the camera and check your private cameras in Live Cams to see if the video appears in the thumbnail. Touch the thumbnail to go to the video screen. If there are any error messages you can adjust the settings and try again by touching the "gears" icon in the application to edit the settings.
This should give you video from your home webcam, but most people will have problems with step #4. I will update this blog with some additional pointers as I see what issues people are commonly running into. If you wish to view your camera while on cellular networks or remote wifi connections you will need a dynamic DNS account instead of the IP address you entered above.
Free accounts are available at www.dyndns.org and you would simply enter the name (like mywebcam.dyndns.info) instead of the IP address in Live Cams.
Barry